ぴーさんログ

だいたいXamarin.Formsのブログ

【Xamarin.Forms】RelativeLayoutで中央に配置する

RelativeLayout の子要素に XConstraint , YConstraint Attached Property をセットすることでレイアウト位置を調整できます。 これはXY座標、つまり左上原点の指定となるため中央に配置するには一手間必要です。(AbsoluteLayoutの場合はいい感じに中央配置しれくるんですけどねー)

サイズ固定の場合

<ActivityIndicator 
    HeightRequest="44"
    WidthRequest="44"
    RelativeLayout.XConstraint =
    "{ConstraintExpression Type=RelativeToParent,
        Property=Width, Factor=0.5, Constant=-22}"
    RelativeLayout.YConstraint =
    "{ConstraintExpression Type=RelativeToParent,
        Property=Height, Factor=0.5, Constant-22}" />

Factor=0.5 指定でViewの左上がRelativeLayoutの中央となるので Constant=-22 で幅高さの半分ずらす。

内容によってサイズが変わる場合

<Label
    x:Name="button"
    Text="{Binding Hoge}" 
    RelativeLayout.XConstraint =
    "{ConstraintExpression Type=RelativeToParent,
        Property=Width, Factor=0.5}"
    RelativeLayout.YConstraint =
    "{ConstraintExpression Type=RelativeToParent,
        Property=Height, Factor=0.5}" />
// Pageのコンストラクタ

InitializeComponent ();
// 中央揃えに見せるトリック
button.SizeChanged += (sender, e) => {
    button.TranslationX = -(button.Width / 2);
    button.TranslationY = -(button.Height / 2);
};

C#側でSizeChangedイベントをハンドリングし、TranslationX / Y を幅高さの半分ずらす。 XAMLで完結させたい場合は、この処理をBehaviorにまとめる。

そもそも

RelativeLayoutへの追加、Constraintの設定を全てC#で行えば問題なく中央に配置できる。(Constraint設定時に座標を返す式を渡すため)

Xamarin.FormsでTextBlockのような事をする

テキストの一部だけ色やフォントサイズを変えたい時、WPFならTextBlockを使いますね? Xamarin.Formsでは Label.FormattedText で実現できます。

サンプル

XAMLで書くとこんな感じ

<Label>
    <Label.FormattedText>
        <FormattedString>
            <Span Text="名前:" ForegroundColor="Gray"/>
            <Span Text="あべなな" FontSize="Large" ForegroundColor="Maroon"/>
            <Span Text=" さん"/>
            <Span Text="{x:Static x:Environment.NewLine}" />
            <Span Text="年齢:"  ForegroundColor="Gray"/>
            <Span Text="17" FontSize="Large" FontAttributes="Bold" ForegroundColor="Maroon"/>
            <Span Text="歳" />
        </FormattedString>
    </Label.FormattedText>
</Label>

結果はこんな感じ

f:id:ticktack623:20160211175321j:plain

C#で書くとこんな感じ

new Label {
    FormattedText = new FormattedString {
        Spans = {
            new Span {
                Text = "名前:",
                ForegroundColor = Color.Gray },
            new Span {
                Text = "あべなな",
                FontSize = Device.GetNamedSize(NamedSize.Large, typeof(Label)),
                ForegroundColor = Color.Maroon },
            new Span { Text = " さん" },
            new Span { Text = System.Environment.NewLine },
            new Span {
                Text = "年齢:",
                ForegroundColor = Color.Gray },
            new Span {
                Text = "17",
                FontSize = Device.GetNamedSize(NamedSize.Large, typeof(Label)),
                FontAttributes = FontAttributes.Bold,
                ForegroundColor = Color.Maroon },
            new Span { Text = " 歳" },
        },
    },
};

残念な点

SpanクラスはBindableObjectではないのでBindningが使えません。のでUserVoiceに投票して待ちましょう。 あるいはサンプルに書いたようにStatic Propertyで何とかするぐらいでしょうか。

Extend Span with bindable Text and TapGesture – Customer Feedback for Xamarin Platform

Unseal Span or Make it Bindable – Customer Feedback for Xamarin Platform

Effectを使ってAndroidのMapViewからボタンを消す

Xamarin.Forms.Maps.Map コントロールを使用する際に現在位置表示、ズーム機能をONにしていると、Android版では地図上にボタンが表示されます。(iOSでは表示されない)

f:id:ticktack623:20160205000621p:plain:w300

iOSと揃えたい、デザインが他と馴染まないので自前で用意したいという場合は邪魔になるので、Effectでネイティブコントロールに介入して消してしまいましょう。

Androidプロジェクト内に新しいEffectクラスを作ります。

using System;
using Xamarin.Forms;
using Xamarin.Forms.Platform.Android;
using Android.Gms.Maps;

[assembly: ResolutionGroupName ("YourCompany")]
[assembly: ExportEffect (typeof (SuppressMapButton.Droid.SuppressMapButtonEffect), "SuppressMapButtonEffect")]

namespace SuppressMapButton.Droid
{
    public class SuppressMapButtonEffect : PlatformEffect
    {
       #region implemented abstract members of Effect
        protected override void OnAttached()
        {
            var mapView = Control as MapView;
            if(mapView == null)
                return;

            // ズームボタン LinearLayout
            var zoomButton = mapView.FindViewById(1);
            if(zoomButton != null)
            {
                zoomButton.Visibility = Android.Views.ViewStates.Gone;
            }
            
            // 現在位置ボタン ImageView
            var locationButton = mapView.FindViewById(2);
            if(locationButton != null)
            {
                locationButton.Visibility = Android.Views.ViewStates.Gone;
            }
        }

        protected override void OnDetached()
        {
        }
       #endregion
    }
}

2016年2月現在では Id:1 がズームボタン、 Id:2 が現在位置ボタンとなっていました。 値の根拠はmapViewStyleになると思うのですがソースを見つけられなかったので確認できてません。

使用する側はこんな感じ。

public App()
{
    MainPage = new ContentPage {
        Content = new Xamarin.Forms.Maps.Map
        {
            IsShowingUser = true,
            HasZoomEnabled = true,
            Effects = {
                Effect.Resolve("YourCompany.SuppressMapButtonEffect"),
            },
        },
    };
}

見事、地図上のボタンを消せました。

f:id:ticktack623:20160205000656p:plain:w300

参考

stackoverflow.com

NControlでもSVG

以前、NGraphicsでSVGが読み込めるようになったとお伝えしました。 それに伴い、内部でNGraphicsを使っているNControlでもSVGを読み込み&描画できるようになった訳なんですが、何も考えないで使うとちょっと悲しい事になるので解説を。

まずは特に工夫せず描画してみましょう。

// ContentPageのコンストラクタ内

var nControlView = new NControlView {
    HeightRequest = 300,
    WidthRequest = 300,
    BackgroundColor = Xamarin.Forms.Color.Gray,

    DrawingFunction = (canvas, rect) =>  {
        // tigerSvgの中身はSVGファイルを読み込んだstring
        using(var reader = new StringReader(tigerSvg))
        {
            var sourceGraphic = Graphic.LoadSvg(reader);
            sourceGraphic.Draw(canvas);
        }                   
    },
};

Content = new StackLayout {
    Children = { nControlView },
    HorizontalOptions = LayoutOptions.Center,
    VerticalOptions = LayoutOptions.Center,
};

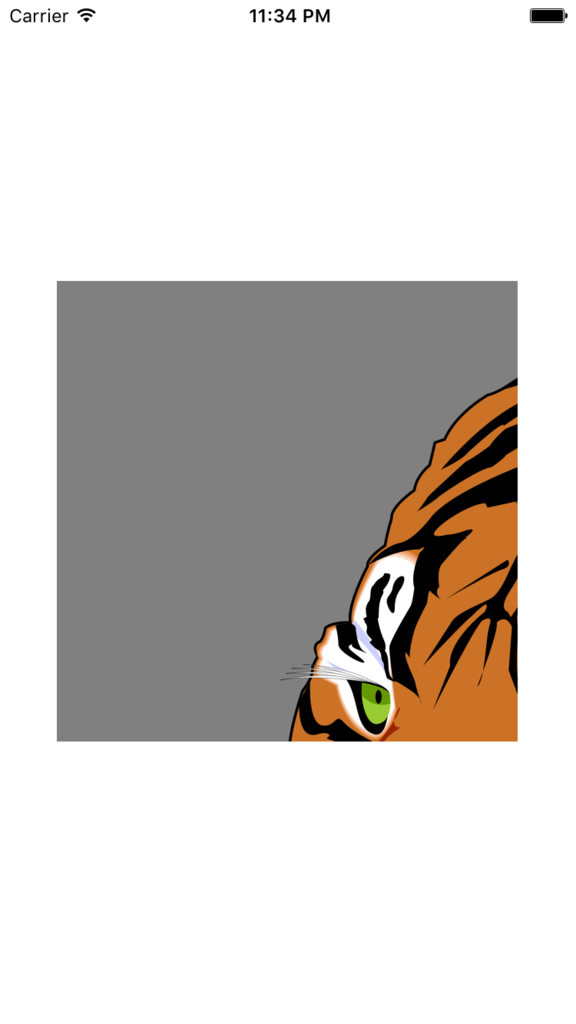
SVGイメージのサイズが大きすぎて見切れてしまいました。

f:id:ticktack623:20160201235752p:plain:w400

DrawingFunctionのrect = NControlViewのサイズに合わせて拡大・縮小して描画する必要があります。 DrawingFunctionの部分を修正しましょう。

DrawingFunction = (canvas, rect) =>  {
    using(var reader = new StringReader(tigerSvg))
    {
        var sourceGraphic = Graphic.LoadSvg(reader);

        // rectに収まる倍率へ縮小する変形情報を生成
        var transform = Transform.AspectFillRect(sourceGraphic.ViewBox, rect);

        // 変形を適用した新しいGraphicインスタンスを生成
        var transformedGraphic = sourceGraphic.TransformGeometry(transform);

        transformedGraphic.Draw(canvas);
    }                   
},

Transform.AspectFillRect() で第1引数のサイズから第2引数のサイズに拡大・縮小するための変形情報を生成します。( Transform.StretchFillRect() というのもあります。) Graphic.TransformGeometry() で変形を適用した新しいGraphicが得られますのでこれをcanvasに描画しましょう。

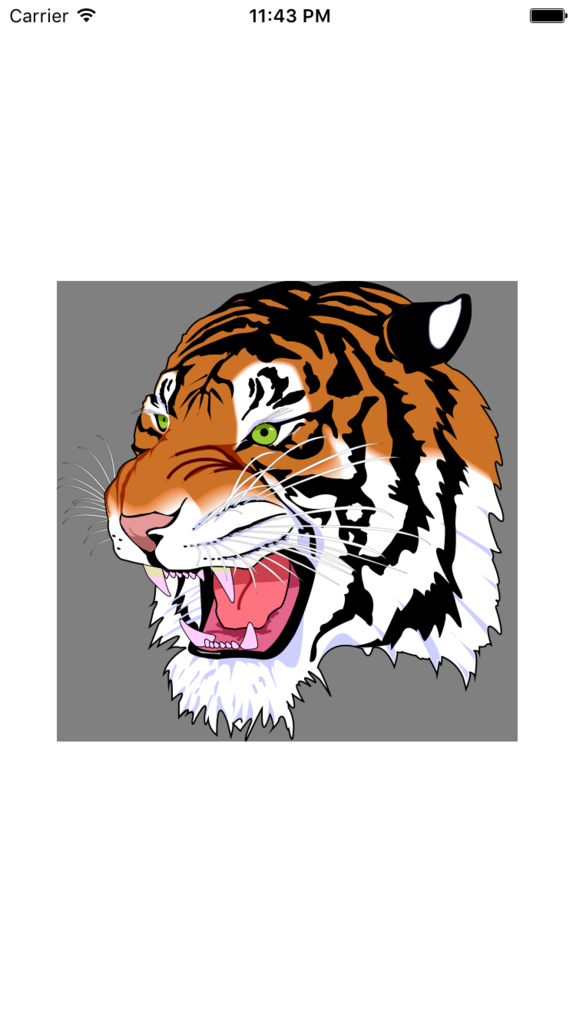
f:id:ticktack623:20160201235812p:plain:w400

コントロールに合うサイズで描画できました。

【Xamarin.Forms 2.1.0(プレビュー)】Effects

Xamarin.Forms 2.1.0 で Effects という新しい概念が追加される予定です。 (個人的な感想として、BehaiviorsやStylesの概念をCutstomRendererに持ち込んだ物がEffectsと捉えるとしっくりきます。)

「Buttonコントロールに枠線を付けたい」といった場合、従来はCustomRendererでプラットフォームごとのViewに手を加えるのが基本的なアプローチでした。 (iOS版のボタンに枠線を付けたかっただけなのに!?)

Effectsを使えばそのようなことがより簡単に、もっと使い回しの効く形で実現できるようになります。

サンプル

早速、枠線を付ける簡単なEffectを作成してみましょう。(iOS用です、iOSのプロジェクト内に書いてください)

using System;
using Xamarin.Forms;
using Xamarin.Forms.Platform.iOS;
using XFApp13.iOS;

[assembly: ResolutionGroupName ("YourCompany")]
[assembly: ExportEffect (typeof (BorderEffect), "BorderEffect")]

namespace XFApp13.iOS
{
    public class BorderEffect : PlatformEffect
    {
        protected override void OnAttached()
        {
            Control.Layer.BorderWidth = 1.0f;
            Control.Layer.BorderColor = Color.Black.ToCGColor();
        }

        protected override void OnDetached()
        {
            Control.Layer.BorderWidth = 0.0f;
        }
    }
}

PlatformEffect を継承して新しいEffectを作ります。 OnAttachedOnDetached の2つは必ず実装しなければなりません。

以下のプロパティを駆使してコントロールに素敵な効果を加えましょう。

  • Container - ViewRenderer (今回の例ではXamarin.Forms.Platform.iOS.ButtonRenderer)
  • Control - ネイティブ側のコントロール (今回の例ではUIKit.UiButton)
  • Element - Xamarin.Formsのコントロール (今回の例ではButton)

共通コードからEffectのインスタンスを得るため、ここで2つの属性をセットしておく必要があります。

  • [assembly: ResolutionGroupName ("YourCompany")] : Effect式別名の名前空間となります。複数アセンブリで同じ名前を使用することができます。
  • [assembly: ExportEffect (typeof (BorderEffect), "BorderEffect")] : Effect毎のユニークなIDをエクスポートします。

使い方

共通コード側でViewにEffectを追加します。

var button = new Button { Text = "I have a border" };
button.Effects.Add( Effect.Resolve( "YourCompany.BorderEffect" ) );

EffectのインスタンスEffect.Resolve staticメソッドで作成します。ここで指定する名前はResolutionGroupName属性とExportEffect属性で指定した名前を結合した物になります。

ちなみにXAMLで書くとこうです。

<Button Text="I hava a border">
    <Button.Effects>
        <Effect x:FactoryMethod="Resolve" >
            <x:Arguments>
                <x:String>YourCompany.BorderEffect</x:String>
            </x:Arguments>
        </Effect>
    </Button.Effects>
</Button>

RoutingEffect

Effect.Resolve の代わりに RoutingEffect を使うと共通コードでタイプセーフにEffectを扱うことができます。

public class BorderEffect : RoutingEffect
{
    public BorderEffect() : base("YourCompany.BorderEffect")
    {
    }
}

この場合、利用側のコードはこうなります。

var button = new Button { Text = "I have a border" };
button.Effects.Add( new BorderEffect() );

最後に

本記事ではEffectsの最低限基本的な使い方を解説しました。簡単のため枠線の幅、色などのパラメーターを全て決め打ちしていますが、本当はもっとパラーメータ設定可能的であるべきです。

Jason Smith氏がAttached Propertyを組み合わせたより実践的な使い方を解説していらっしゃるので、是非そちらも合わせてお読みください。

Using Effects - Xamarin.Forms Complete

参考

Xamarin.Forms 2.1.0-pre2 Released - Xamarin Forums

Using Effects - Xamarin.Forms Complete

【Xamarin.Forms 2.1.0(プレビュー)】DataTemplateSelector

Xamarin.Forms 2.1.0 で DataTemplateSelector が追加される予定です。

DataTemplateSelector を簡単に説明すると 「条件に応じたDataTemplateを返すDataTemplate」 です。

サンプル

サンプルとして、各セルのデータ型に合わせたテンプレートを返すDataTemplateSelectorを作成してみましょう。 DataTemplateSelectorを継承し、OnSelectTemplate()を実装します。

public class MyDataTemplateSelector : DataTemplateSelector
{
    private readonly DataTemplate defaulTemplate;
    private readonly Dictionary<Type, DataTemplate> templateSet;

    public MyDataTemplateSelector(Dictionary<Type, DataTemplate> templateSet)
    {
        this.templateSet = templateSet;

        defaulTemplate = new DataTemplate(typeof(TextCell));
        defaulTemplate.SetBinding(TextCell.TextProperty, new Binding(".", stringFormat:"{0}"));
    }

    #region implemented abstract members of DataTemplateSelector
    // itemにはセルのデータ、containerにはセルの親(ListViewやTableView)が渡される
    protected override DataTemplate OnSelectTemplate(object item, BindableObject container)
    {
        DataTemplate template;
        if(templateSet != null && 
            templateSet.TryGetValue(item.GetType(), out template))
        {
            return template;
        }

        return defaulTemplate;
    }
    #endregion
}

利用側のコードはこんな感じ。

public App()
{
    var colorTemplate = new DataTemplate(typeof(TextCell));
    colorTemplate.SetBinding(TextCell.TextProperty, new Binding(".", stringFormat: "Color:{0}"));
    colorTemplate.SetBinding(TextCell.TextColorProperty, ".");

    var boolTemplate = new DataTemplate(typeof(SwitchCell));
    boolTemplate.SetBinding(SwitchCell.OnProperty, ".");

    var templateSelector = new MyDataTemplateSelector(
        new Dictionary<Type, DataTemplate> {
            {typeof(Color), colorTemplate},
            {typeof(bool), boolTemplate},
    });
    
    MainPage = new ContentPage {
        Content = new ListView {
            ItemTemplate = templateSelector,
            ItemsSource = new object [] {
                Color.Blue,
                false,
                true,
                Color.Red,
                Color.Teal,
                true,
                "Hello World", // ここからはデフォルトテンプレートの確認用
                1,
                33.4,
            },
        }
    };
}

結果はこのようになります。

f:id:ticktack623:20160125072849p:plain

制限事項

  • Androidでは1つのListViewにつきテンプレート20個まで。
  • DataTemplateSelectorのサブクラスは常に同じデータに対して同じテンプレートを返すこと。
  • DataTemplateSelectorは別のDataTemplateSelectorを返してはならない。
  • DataTemplateSelectorは呼び出し毎に新しいDataTemplateのインスタンスを返してはならない、同じインスタンスを返すこと。さもなくば、結果的に仮想化を無効にし、巨大なメモリリークにつながる。

参考

Xamarin.Forms 2.1.0-pre2 Released - Xamarin Forums