Xamarin.Forms 2.1.0で BindableProperty.Create() のジェネリック版が廃止予定となります。
使っている人は今のうちに修正しておいた方が良いかも。
【Xamarin.Forms 2.1.0(プレビュー)】HasUnevenRows dynamic sizing support
ListView.HasUnevenRows = true の場合、Cellのサイズを動的に変更できるようになります。
Androidでは元々動的にサイズ変更されてましたが、今回の変更で Cell.ForceUpdateSize() を呼ぶとサイズが更新される仕様になります。
「プラットフォームによっては処理コストが高い」との事で、実際iOSで使うとサイズ更新への追従が遅いです。
サンプル
確認用のカスタムViewCellを作成、スライダーに連動してBoxViewの高さが変わります。 ルート要素であるStackLayoutのMeasureInvalidatedイベントに合わせて Cell.ForceUpdateSize() を呼ぶことでListViewのCellサイズが更新されます。
public class MyViewCell : ViewCell
{
    public MyViewCell()
    {
        var label = new Label();
        label.SetBinding(Label.TextProperty,
            ".", BindingMode.OneWay);

        var slider = new Slider {
            Maximum = 100,
            Minimum = 0,
            Value = 50,
        };

        var boxView = new BoxView {
            Color = Color.Blue,
            BindingContext = slider,
        };
        boxView.SetBinding(BoxView.HeightRequestProperty,
            "Value", BindingMode.OneWay);

        var stackLayout = new StackLayout {
            Children = {
                label,
                slider,
                boxView,
            },
        };

        // ここでListViewのCellサイズが更新される
        stackLayout.MeasureInvalidated +=
            (sender, e) => ForceUpdateSize();

        View = stackLayout;
    }
}
利用側のソース
// Appクラスのコンストラクタ
MainPage = new ContentPage {
    Content = new ListView {
        HasUnevenRows = true,
        ItemsSource = new [] {1, 2, 3, 4, 5, 6,},
        ItemTemplate = new DataTemplate(typeof(MyViewCell)),
    },
};
結果はこうなります。
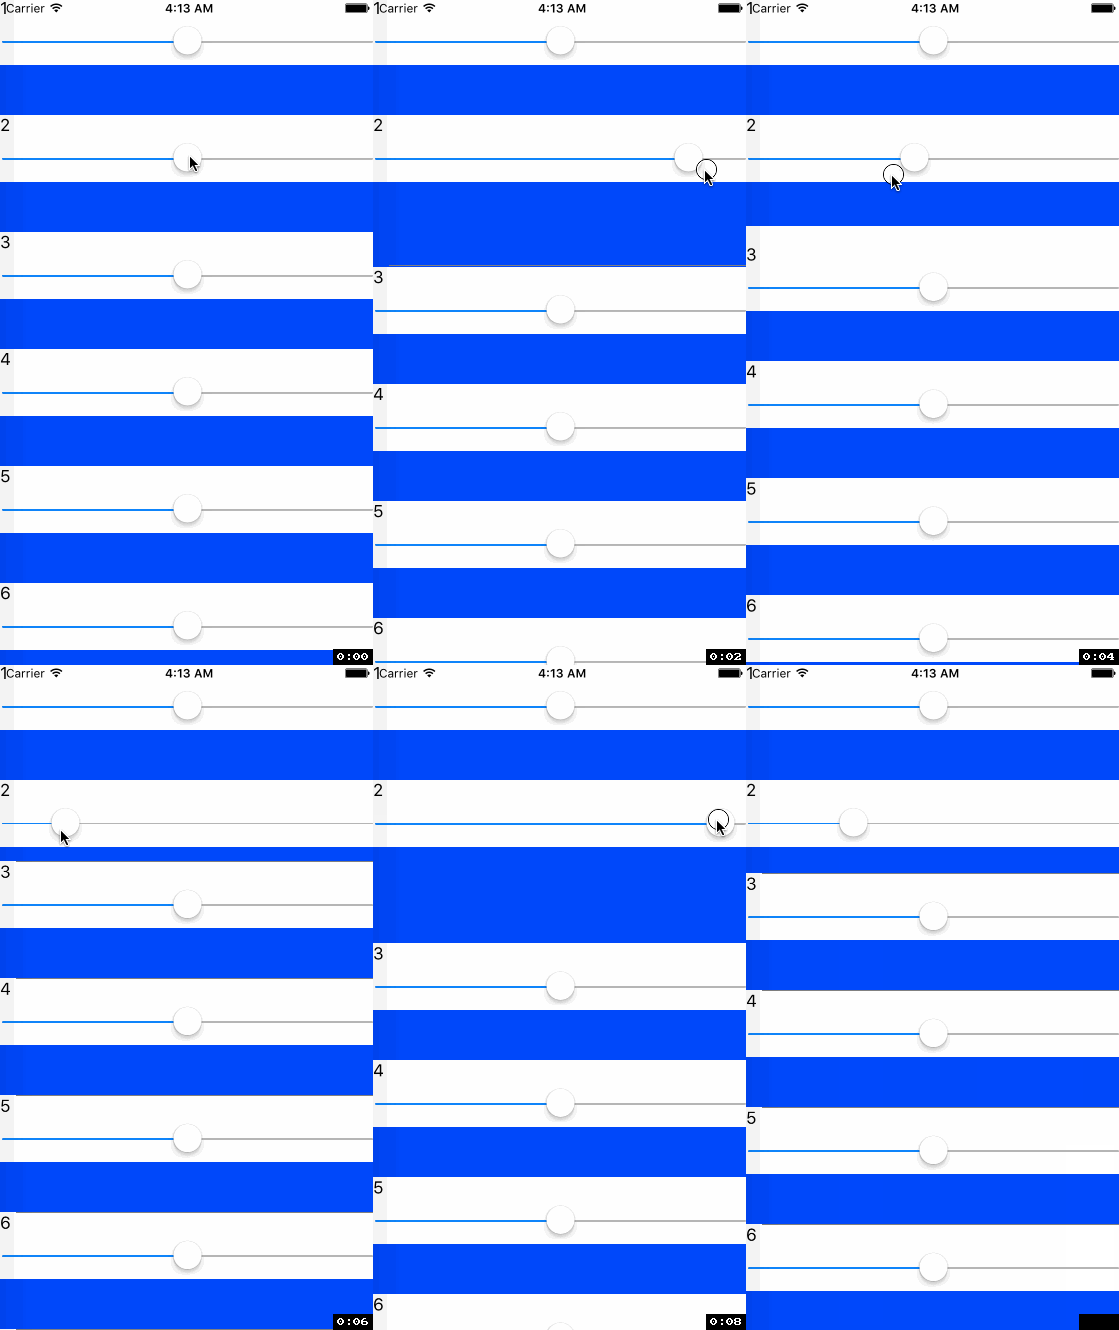
セパレータの追従が遅くてBoxViewに埋まっていますね。自然に見せるためには一工夫が必要かも。
参考
【Xamarin.Forms 2.1.0(プレビュー)】ControlTemplate
Xamarin.Forms 2.1.0 で ControlTemplate が追加される予定です。
Xamarin.Forms 2.1.0-pre2 Released - Xamarin Forums
ControlTemplate は次のクラスで使用可能です。
ContentPageContentViewTemplatedPageTemplatedView
TemplatedPage、TemplatedView が追加され、それに伴いContentPageの基底クラスがTemplatedPageへ、 ContentViewの基底クラスがTemplatedViewへ変更されます。
サンプル
TemplatedViewを継承してユーザーコントロールを作成します。ここにはUI定義が一切書かれていないことに注目してください。
using System;
using Xamarin.Forms;
using System.Windows.Input;

namespace XFApp10
{
    public class LoginView : TemplatedView
    {
        public static readonly BindableProperty UserNameProperty =
            BindableProperty.Create("UserName", typeof(string), typeof(TemplateSamplePage), null, BindingMode.TwoWay);

        public string UserName
        {
            get { return (string)GetValue(UserNameProperty); }
            set { SetValue(UserNameProperty, value); }
        }

        public static readonly BindableProperty PasswordProperty =
            BindableProperty.Create("Password", typeof(string), typeof(TemplateSamplePage), null, BindingMode.TwoWay);

        public string Password
        {
            get { return (string)GetValue(PasswordProperty); }
            set { SetValue(PasswordProperty, value); }
        }

        public static readonly BindableProperty CommandProperty =
            BindableProperty.Create("Command", typeof(ICommand), typeof(TemplateSamplePage), null);

        public ICommand Command
        {
            get { return (ICommand)GetValue(CommandProperty); }
            set { SetValue(CommandProperty, value); }
        }
    }
}
LoginViewにセットするControlTemplateはApp.xamlで定義します。App.xamlを追加する方法は@omanukeさんのXamarin.FormsでApp.xamlを追加する方法 - omanuke-ekunamoの日記を参照で。
<?xml version="1.0" encoding="UTF-8"?>
<Application xmlns="http://xamarin.com/schemas/2014/forms"
             xmlns:x="http://schemas.microsoft.com/winfx/2009/xaml"
             x:Class="XFApp10.App">
    <Application.Resources>
        <ResourceDictionary>
            <!-- LoginViewの見た目 -->
            <ControlTemplate x:Key="LoginViewTemplate">
                <StackLayout VerticalOptions="CenterAndExpand" Spacing="20" Padding="20" >
                    <Entry Text="{TemplateBinding UserName, Mode=TwoWay}" Placeholder="UserName" />
                    <Entry Text="{TemplateBinding Password, Mode=TwoWay}" Placeholder="Password" />
                    <Button Command="{TemplateBinding Command}" Text="Click Here To Log In" />
                </StackLayout>
            </ControlTemplate>
        </ResourceDictionary>
    </Application.Resources>
</Application>
LoginViewのプロパティとテンプレートの紐付けには TemplateBinding を使用します。これも新しい構文です、通常のBinding構文とは別なので注意。
ViewModelのプロパティとバインドしたい場合(ControlTemplatesでするべきではないと思いますが) {TemplateBinding BindingContext.Hoge} のようにBindingContextを経由することでアクセス可能です。
LoginViewを利用するXAMLコード。
<?xml version="1.0" encoding="UTF-8"?>
<ContentPage xmlns="http://xamarin.com/schemas/2014/forms"
             xmlns:x="http://schemas.microsoft.com/winfx/2009/xaml"
             xmlns:local="clr-namespace:XFApp10;assembly=XFApp10"
             x:Class="XFApp10.MyPage" >
    <ContentPage.Content>
        <local:LoginView ControlTemplate="{StaticResource LoginViewTemplate}"
                         UserName="{Binding UserName}"
                         Password="{Binding Password}"
                         Command="{Binding Command}" />
    </ContentPage.Content>
</ContentPage>
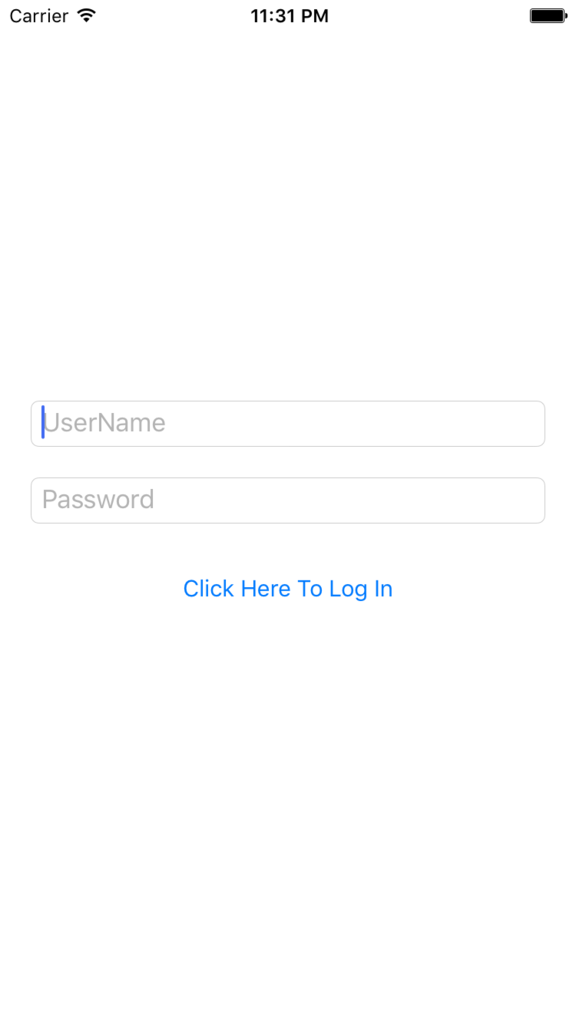
こちらでViewModelとバインドすればControlTemplateとViewModelが繋がります。
結果はこのようになります。
WPFとの比較
WPFではButtonなど既存コントロールの見た目をカスタムする際にControlTemplateがよく使用されますが、Xamarin.Formsの場合はControlTemplateに対応したクラスは最初に説明した4つしかありません。 なので、基本的にユーザーコントロールを作成する際に使用する物という認識で良いでしょう。 縦向き用、横向き用のレイアウトをControlTemplateで用意して切り変えるという使い方はアリかも。
Xamarin.FormsはMerged Dictionaryに対応していません。(バージョン2.1.0プレビュー時点) そのためコントロール毎にテンプレートを定義したResourceDictionaryファイルを用意する、といった使い方ができません。
参考
「NGraphics」がSVGを読み込めるようになりました
以前このブログで紹介した「NGraphics」がバージョンアップしてSVGを扱えるようになってました。
Xamarinでも使えるクロスプラットフォームなベクタグラフィクスライブラリ 「NGrapchics」 - ぴーさんログ
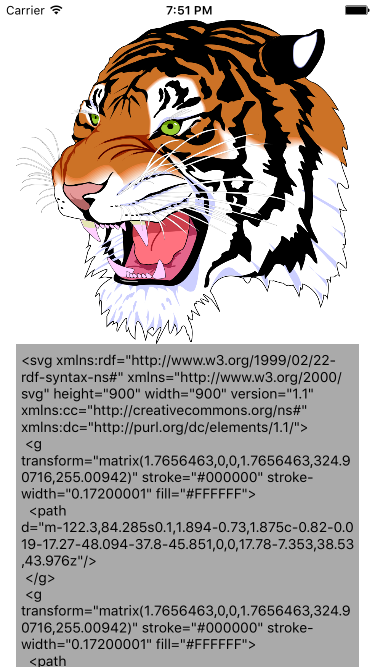
という訳で早速使い方を確認してみましょう。表示するのはSVGサンプルとして定番らしいこのトラの画像です。

SVGの読み込みは NGraphics.Graphic.LoadSvg(TextReader reader) で行います。
ファイルから読む場合はStreamReader、リテラルから読む場合はStringReaderを使うと良いでしょう。
サンプルは以前の記事に合わせてXamarin.iOSです。graphic.Draw()までの流れは他プラットフォームでも同様ですね。
using System;
using UIKit;
using NGraphics;
using System.IO;

namespace NGraphicsSvgSample
{
    public partial class ViewController : UIViewController
    {
        // (省略)
        public override void ViewDidLoad()
        {
            base.ViewDidLoad();

            // graphic.Drawm() までは他のプラットフォームでも同様
            IImageCanvas canvas = null;
            using(var reader = new StringReader(svgTiger))
            {
                var graphic = Graphic.LoadSvg(reader);
                canvas = Platforms.Current.CreateImageCanvas(graphic.Size);
                graphic.Draw(canvas);
            }

            imageView.Image = canvas?.GetImage()?.GetUIImage();
            textView.Text = svgTiger;
        }
        // (省略)

        // tiger.svg の中身
        private readonly string svgTiger = @"<svg xmlns:rdf=""http://www.w3.org/1999/02/22-rdf-syntax-ns#"" xmlns=""http://www.w3.org/2000/svg"" height=""900"" width=""900"" version=""1.1"" xmlns:cc=""http://creativecommons.org/ns#"" xmlns:dc=""http://purl.org/dc/elements/1.1/"">
      ...
</svg>";
    }
}
結果はこんな感じ、バッチリSVGデータを描画できました。
【Xamarin.Forms】TypeConverterの使い方
この記事は「Xamarin Advent Calendar 2015 - Qiita」の9日目です。
TypeConverterはXAMLでプロパティの値を指定する際、文字列から実際の方への変換を手助けしてくれます。(Binding時に登場するIValueConverterとは別物) Xamarin AC 5日目の記事で紹介したXFXamlAnimationsでもEasingプロパティなどで使われています。
例えば、XAML内で Padding="0,20,0,0" や TextColor="Red" と書くと、それぞれ Thicness 、 Color に変換されます。これはビルトインされたTypeConverterのおかげです。
ビルトインTypeConverterが対応していない方への変換は独自に設定する必要があります。この記事ではその方法を解説します。
余談ですが、enum型はTypeConverterを使わなくても変換してくれるようです。(メンバ名、数値から変換可能)
サンプル
モデルケースとして、Labelコントロールを継承してColorThemeという独自プロパティを備えたMyLabelコントロールを作成します。
public class MyLabel : Label
{
   #region ColorTheme BindableProperty
    public static readonly BindableProperty ColorThemeProperty =
        BindableProperty.Create<MyLabel, ColorTheme>(p => p.ColorTheme, default(ColorTheme),
         propertyChanged: (bindable, oldValue, newValue) =>
            ((MyLabel)bindable).ColorTheme = newValue);

    public ColorTheme ColorTheme
    {
        get { return (ColorTheme)GetValue(ColorThemeProperty); }
        set
        {
            SetValue(ColorThemeProperty, value);
            ChangeColor(value);
        }
    }
   #endregion

    private void ChangeColor(ColorTheme theme)
    {
        if(theme == null)
            return;

        BackgroundColor = theme.BaseColor;
        TextColor = theme.AccentColor;
    }
}

public class ColorTheme
{
    public Color AccentColor
    {
        get;
        set;
    }

    public Color BaseColor
    {
        get;
        set;
    }

    public static ColorTheme Dark
    {
        get
        {
            return new ColorTheme
            {
                AccentColor = Color.White,
                BaseColor = Color.Gray,
            };
        }
    }

    public static ColorTheme Light
    {
        get
        {
            return new ColorTheme
            {
                AccentColor = Color.Black,
                BaseColor = Color.White,
            };
        }
    }
}
Viewです、ColorThemeは名前(Dark、Light)で指定したいのでとりあえず書いてみましょう。
<ContentPage.Content>
    <StackLayout VerticalOptions="Center">
        <local:MyLabel Text="Dark" ColorTheme="Dark" />
        <local:MyLabel Text="Light" ColorTheme="Light" />
    </StackLayout>
</ContentPage.Content>
このまま実行すると...
Xamarin.Forms.Xaml.XamlParseException Position 10:31. Cannot assign property "ColorTheme": type mismatch between "System.String" and "XFApp4.ColorTheme"
XAML解析時に「string型からColorTheme型へ変換できません」と怒られてしまいました。まぁ、そうなるな。
独自のTypeConverterを作る
ColorThemeのためのTypeConverterを用意しましょう。
public class ColorThemeTypeConverter : TypeConverter
{
   #region implemented abstract members of TypeConverter
    public override bool CanConvertFrom(Type sourceType)
    {
        return sourceType == typeof(string);
    }

    public override object ConvertFrom(System.Globalization.CultureInfo culture, object value)
    {
        if(value == null)
            return null;

        if("Dark".Equals(value))
        {
            return ColorTheme.Dark;
        }
        if("Light".Equals(value))
        {
            return ColorTheme.Light;
        }

        throw new InvalidOperationException(
            string.Format("Conversion failed: {0} into {1}", value, typeof(ColorTheme)));
    }
   #endregion
}
overrideすべきメソッドは2つ
bool CanConvertFrom(Type sourceType)- XAMLからの変換に使う場合、string型であるかどうかを確認すればOKです。
object ConvertFrom(System.Globalization.CultureInfo culture, object value)- 文字列を解析して適切なインスタンスを返しましょう。
次に、MyLabelに修正を加えましょう。ColorThemeプロパティにTypeConverterAttirbuteを付加してColorThemeTypeConverterが呼ばれるようにします。
public class MyLabel : Label
{
    // 省略

    // TypeConverterAttribureを付加
    [TypeConverter(typeof(ColorThemeTypeConverter))]
    public ColorTheme ColorTheme
    {
        get { return (ColorTheme)GetValue(ColorThemeProperty); }
        set
        {
            SetValue(ColorThemeProperty, value);
            ChangeColor(value);
        }
    }

    // 省略
}
再度実行してみると...
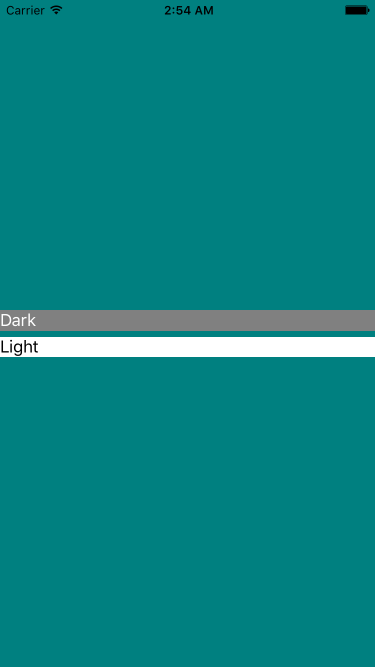
無事、XAMLから指定したColorThemeが反映されました。やったね。
INotifyPropertyChangedなViewModelをReactivePropertyに移行するとどう変わるか
前回の記事でサンプル用に割とオーソドックスViewModelを作ったところ、ReactivePropertyに置き換えた場合と比較したら面白そうだと思ったので書いてみます。
目次
- INotifyPropertyChangedインターフェースを実装しなくなる
- 変更通知プロパティのコードが短くなる
- ICommand.CanExecuteChangedの管理がラクになる
- Binding記述が少し長くなる
1. INotifyPropertyChangedインターフェースを実装しなくなる
PropertyChangedイベントの発火はReactivePropertyがやってくれるので、ViewModelはINotifyPropertyChangedを実装する必要がありません。「全てのViewModelがINotifyPropertyChangedを実装した基底クラスから派生する」といった定番スタイルと比較しても、継承関係が自由になるという利点があります。
public class ViewModel /* : INotifyPropertyChanged */
{
    /* 略 */

/* まるっと不要になる
   public event PropertyChangedEventHandler PropertyChanged;

   protected void RaisePropertyChanged(string propertyName)
   {
       PropertyChanged?.Invoke(this, new PropertyChangedEventArgs(propertyName));
   }
*/
}
2. 変更通知プロパティのコードが短くなる
使用前 (INotifyPropertyChanged)
private string entryText;
public string EntryText
{
    get { return entryText; }
    set
    {
        if(entryText != value)
        {
            entryText = value;
            RaisePropertyChanged(nameof(EntryText));
        }
    }
}
使用後 (ReactiveProperty)
public ReactiveProperty<string> EntryText
{
    get;
} = new ReactiveProperty<string>();
行数が約半分になります。タイプ数はコードスニペットで減らす事も可能ですが、行数が少ないと全体の見通しも良くなるのでReactivePropertyの方がいい感じです。
3. ICommand.CanExecuteChangedの管理がラクになる
ReactivePropertyの中には ReactiveCommand というICommand実装が含まれています。これはReactivePropertyや変更通知プロパティ、ReactiveExtensionsのイベントストリームなどをソースにインスタンスを生成する事が可能で、元ソースの変化に連動して ICommand.CanExecute() の状態を切り替えてくれます。つまるところ、自分で ICommand.CanExecuteChanged イベントを発火する必要がなくなります。
使用前 (INotifyPropertyChanged)
public Command SaveCommand
{
    get;
}

public ViewModel()
{
    // Command実行時の処理はインスタンス生成時に渡す
    SaveCommand = new Command(() => {
        Texts.Add(EntryText);
        EntryText = "";
    }, () => IsValid);

    // IsValid変更通知プロパティのsetterで発火してもいいが、SaveCommand生成の記述が分散してしまうので敢えてこのように書いている
    PropertyChanged += (sender, e) => {
        if(e.PropertyName == nameof(IsValid))
        {
            SaveCommand.ChangeCanExecute();
        }
    };
}
使用後 (ReactiveProperty)
public ReactiveCommand SaveCommand
{
    get;
}

public ReactiveViewModel()
{
    // ReactiveProperty<bool>から生成することでソースに連動してCanExecuteChangedイベントが発火される
    SaveCommand = IsValid.ToReactiveCommand(false);
    // Command実行時の処理はSubscribe時に渡す("Commandが実行された"というイベントを購読する)
    SaveCommand.Subscribe((_) => {
        Texts.Add(EntryText.Value);
        EntryText.Value = "";
    });
}
4. Binding記述が少し長くなる
ReactivePropertyで中の値にアクセスするには ReactiveProperty.Value プロパティを参照するというだけの話なのですが、いかんせん数が多くなりがちなので注意が必要です。忘れると「なぜ更新されないのか...」と軽くハマることもあるので気に留めておきましょう。
使用前 (INotifyPropertyChanged)
Text="{Binding EntryText, Mode=TwoWay}"
使用後 (ReactiveProperty)
Text="{Binding EntryText.Value, Mode=TwoWay}"
まとめ
たとえReactiveExtentionsを利用しなかったとしても、単純に楽ができるのでじゃんじゃん使ったらいいと思います。
以下全体の比較
使用前 (INotifyPropertyChanged)
using System.Collections.ObjectModel;
using System.ComponentModel;
using Xamarin.Forms;

namespace XFApp8
{
    public class ViewModel : INotifyPropertyChanged
    {
        private string entryText;
        public string EntryText
        {
            get { return entryText; }
            set
            {
                if(entryText != value)
                {
                    entryText = value;
                    RaisePropertyChanged(nameof(EntryText));
                }
            }
        }

        private bool isValid;
        public bool IsValid
        {
            get { return isValid; }
            private set
            {
                if(isValid != value)
                {
                    isValid = value;
                    RaisePropertyChanged(nameof(IsValid));
                }
            }
        }

        public ObservableCollection<string> Texts
        {
            get;
        } = new ObservableCollection<string>{ "first", "second", "third" };

        public Command ValidateCommand
        {
            get;
        }

        public Command SaveCommand
        {
            get;
        }

        public ViewModel()
        {
            ValidateCommand = new Command(() => IsValid = !string.IsNullOrEmpty(EntryText));
            SaveCommand = new Command(() => {
                Texts.Add(EntryText);
                EntryText = "";
            }, () => IsValid);

            PropertyChanged += (sender, e) => {
                if(e.PropertyName == nameof(IsValid))
                {
                    SaveCommand.ChangeCanExecute();
                }
            };
        }

       #region INotifyPropertyChanged implementation
        public event PropertyChangedEventHandler PropertyChanged;

        protected void RaisePropertyChanged(string propertyName)
        {
            PropertyChanged?.Invoke(this, new PropertyChangedEventArgs(propertyName));
        }
       #endregion
    }
}
使用後 (ReactiveProperty)
using System;
using System.Collections.ObjectModel;
using Reactive.Bindings;

namespace XFApp8
{
    public class ReactiveViewModel
    {
        public ReactiveProperty<string> EntryText
        {
            get;
        } = new ReactiveProperty<string>();

        public ReactiveProperty<bool> IsValid
        {
            get;
        } = new ReactiveProperty<bool>(false);

        public ObservableCollection<string> Texts
        {
            get;
        } = new ObservableCollection<string>{ "first", "second", "third" };

        public ReactiveCommand ValidateCommand
        {
            get;
        } = new ReactiveCommand();

        public ReactiveCommand SaveCommand
        {
            get;
        }

        public ReactiveViewModel()
        {
            ValidateCommand.Subscribe((_) =>
                IsValid.Value = !string.IsNullOrEmpty(EntryText.Value));

            SaveCommand = IsValid.ToReactiveCommand(false);
            SaveCommand.Subscribe((_) => {
                Texts.Add(EntryText.Value);
                EntryText.Value = "";
            });
        }
    }
}
Xamarin.FormsでAttachedProperty
AttachedProperty はMicrosoftのXAMLプラットフォームから移植された概念の一つで、MSDNの日本語版では「添付プロパティ」と訳されています。その性質は「任意のオブジェクトにプロパティを生やすことができる」というものです。
分かりやすい具体例は Grid.Row や Grid.Column ですね。これらはGridの子コントロールが本来持っていなかった「どこに配置されるべきか」を表すプロパティを追加しています。
余談 WPFのBehaviors、TriggersはAttachedPropertyで実装されていましたが、Xamarin.FormsではVisualElementクラスのプロパティとなっています。(後発だから?)
AttachedPropertyの使い方のサンプルとして、EntryコントロールのTextChangedイベント発火時にCommandに実行するためのAttachedPropertyを作ってみましょう。(AttachedPropertyを使ったトリックとしては割と定番らしい?)
実はAttachedPropertyという型は存在せず、実際の型はBindablePropertyとなっており、BindableProperty.CreateAttachedメソッドで作成します。別クラスに添付する都合上、getter/setterはstaticメソッドとして定義する必要があります。
public class EntryBehavior
{
    // AttachedProperty定義
    public static readonly BindableProperty TextChangedCommandProperty =
        BindableProperty.CreateAttached<EntryBehavior, ICommand>(
            bindable => GetTextChangedCommand(bindable), /* static getter */
            null, /* デフォルト値 */
            BindingMode.OneWay, /* デフォルトBindingMode */
            null, /* ValidateValueデリゲート */
            OnTextChangedCommandPropertyChanged, /* PropertyChangedデリゲート */
            null, /* PropertyChangingデリゲート */
            null /* CreateDefaultValueデリゲート */
        );

    // AttachedProperty用のgetter、setter
    public static ICommand GetTextChangedCommand(BindableObject bindable)
    {
        return (ICommand)bindable.GetValue(EntryBehavior.TextChangedCommandProperty);
    }
    public static void SetTextChangedCommand(BindableObject bindable, Command value)
    {
        bindable.SetValue(EntryBehavior.TextChangedCommandProperty, value);
    }

    // Entry以外に使われた場合は何もしない
    private static void OnTextChangedCommandPropertyChanged(BindableObject bindable, ICommand oldValue, ICommand newValue)
    {
        Entry entry = bindable as Entry;
        if(entry == null)
            return;

        if(newValue != null)
        {
            entry.TextChanged += OnTextChanged;
        }
        else
        {
            entry.TextChanged -= OnTextChanged;
        }
    }

    // Entry.TextChangedに登録するイベントハンドラでCommandを実行する
    private static void OnTextChanged(object sender, TextChangedEventArgs e)
    {
        ICommand command = GetTextChangedCommand(sender as BindableObject);
        if(command != null)
        {
            if(command.CanExecute(e))
            {
                command.Execute(e);
            }
        }
    }
}
サンプル用のViewModel
INotifyPropertyChangedを実装した割とオーソドックスなViewModel。
public class ViewModel : INotifyPropertyChanged
{
    private string entryText;
    public string EntryText
    {
        get { return entryText; }
        set
        {
            if(entryText != value)
            {
                entryText = value;
                RaisePropertyChanged(nameof(EntryText));
            }
        }
    }

    private bool isValid;
    public bool IsValid
    {
        get { return isValid; }
        private set
        {
            if(isValid != value)
            {
                isValid = value;
                RaisePropertyChanged(nameof(IsValid));
            }
        }
    }

    public ObservableCollection<string> Texts
    {
        get;
    } = new ObservableCollection<string>{ "first", "second", "third" };

    // このCommandをAttachedProperty経由で実行する
    public Command ValidateCommand
    {
        get;
    }

    public Command SaveCommand
    {
        get;
    }

    public ViewModel()
    {
        ValidateCommand = new Command(() => IsValid = !string.IsNullOrEmpty(EntryText));

        SaveCommand = new Command(() => {
            Texts.Add(EntryText);
            EntryText = "";
        }, () => IsValid);

        PropertyChanged += (sender, e) => {
            if(e.PropertyName == nameof(IsValid))
            {
                SaveCommand.ChangeCanExecute();
            }
        };
    }

   #region INotifyPropertyChanged implementation
    public event PropertyChangedEventHandler PropertyChanged;

    protected void RaisePropertyChanged(string propertyName)
    {
        PropertyChanged?.Invoke(this, new PropertyChangedEventArgs(propertyName));
    }
   #endregion
}
サンプル用のView
Entryコントロールに先ほど作成したEntryBehavior.TextChangedCommandプロパティを添付、入力内容が変わるごとにバインドされたValidateCommandでテキストが評価されます。そして、結果がOKならばボタンが押せるようになり、NGならボタンは押せなくなる、というサンプルです。
<?xml version="1.0" encoding="UTF-8"?>
<ContentPage xmlns="http://xamarin.com/schemas/2014/forms"
             xmlns:x="http://schemas.microsoft.com/winfx/2009/xaml"
             xmlns:local="clr-namespace:XFApp8;assembly=XFApp8"
             x:Class="XFApp8.MyPage">
    <ContentPage.BindingContext>
        <local:ViewModel />
    </ContentPage.BindingContext>

    <ContentPage.Content>
        <StackLayout Padding="30">
            <!-- AttachedPropertyを使ってCommandを実行し、バリデーションを行う -->
            <Entry Text="{Binding EntryText, Mode=TwoWay}"
                   local:EntryBehavior.TextChangedCommand="{Binding ValidateCommand}" />

            <!-- バリデーション結果によって押せたり、押せなかったり -->
            <Button Command="{Binding SaveCommand}" >
                <Button.Style>
                    <Style TargetType="Button">
                        <Style.Triggers>
                            <Trigger TargetType="Button"
                                     Property="IsEnabled"
                                     Value="true">
                                <Setter Property="Text" Value="保存します" />
                            </Trigger>
                            <Trigger TargetType="Button"
                                     Property="IsEnabled"
                                     Value="false">
                                <Setter Property="Text" Value="何か入力してください" />
                            </Trigger>
                        </Style.Triggers>
                    </Style>
                </Button.Style>
            </Button>
            <ListView ItemsSource="{Binding Texts}">
                <ListView.ItemTemplate>
                    <DataTemplate>
                        <TextCell  Text="{Binding }" />
                    </DataTemplate>
                </ListView.ItemTemplate>
            </ListView>
        </StackLayout>
    </ContentPage.Content>
</ContentPage>
AttachedPopertyの部分はこういう書き方もできます。(Interaction.Behaviorsっぽい書き方)
<Entry Text="{Binding EntryText, Mode=TwoWay}" >
    <local:EntryBehavior.TextChangedCommand>
        <Binding Path="ValidateCommand" />
    </local:EntryBehavior.TextChangedCommand>
</Entry>
このサンプルを実行すると...
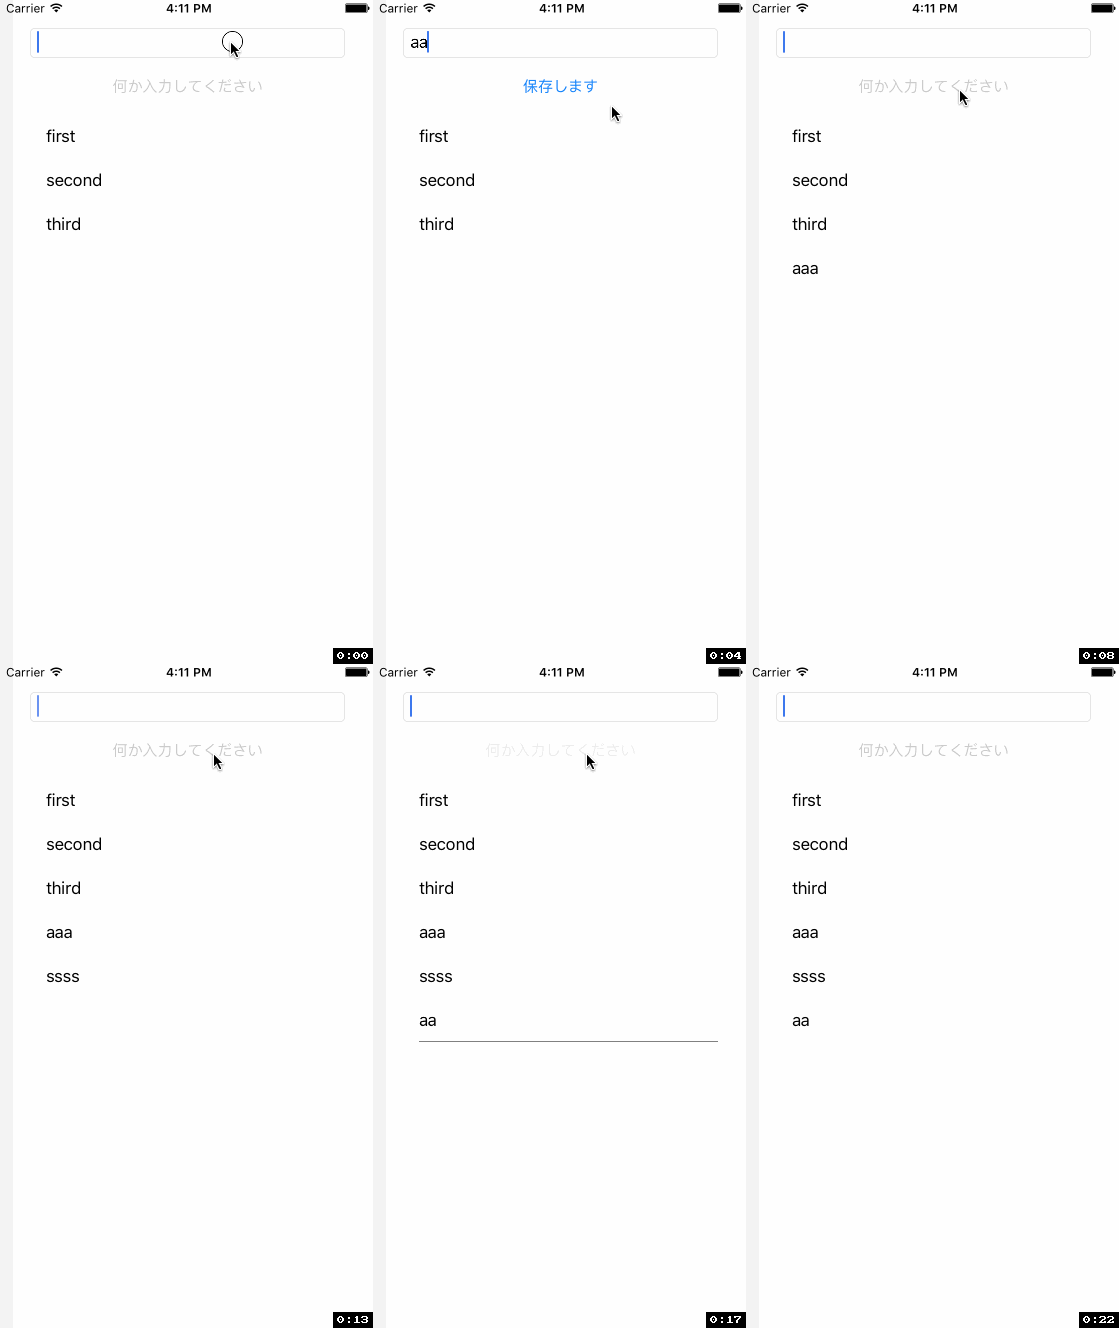
ちゃんと、AttachedPropertyにバインドしたコマンド経由でIsValidプロパティが更新されました。