ぴーさんログ

だいたいXamarin.Formsのブログ

Xamarin Live Playerの仕組みを想像してた

今朝起きるとBuild 2017の2日目にXamarin Live Player(以降XLPと省略します)という技術が発表されていたので、今日はその仕組みについて想像していました。

5/12 午前

この時点では、どうやらXLPは「Mac不要でiOSアプリをビルドしてデバッグできる」技術らしいと把握していました。

「またまた皆騙されちゃってー、iOSアプリをビルドするならMacは必要、見えないところにいるだけでしょう」と想像した図がこちら。

断っておくとこの想像図は間違っています。(そもそも「iOSアプリをビルドする技術」という理解が間違っている)

一応、この想像図について解説すると

iOSアプリのビルド

現在でもmachinecloudのようなMacを貸し出すクラウドサービスやVisual Studio Mobile Centerを利用することで手元にMacマシンが無くてもiOSアプリをビルドすることが可能です。

iPhoneへのアプリの配信

MicrosoftはHokkeyAppというサービスを持っていて、その中にはテスト用アプリの配布機能も含まれます。iPhoneへのアプリ配布もできそう。

デバッグ

以前からwi-fi経由でのリモートデバッグは可能でした。

とまあ、既存技術の組み合わせでできそうな気がしました。間違ってるんですけどね。

5/12 午後

新しい情報を得て考えを改めます。

ここでXLPの制限事項の存在を認識します。

Xamarin Live Playerの制限事項

Xamarin公式のGuidesによると、主だった物として以下のような制限がある模様。

  • Android: AXMLファイル(Xamarin.AndroidにおけるAndroidリソースの拡張子)がサポートされません。
  • iOS: storyboadの一部の機能やXIBがサポートされません。
  • サブクラスの実装ができません(?)

なるほど、リソースやレイアウトファイルはビルド時にAndroid/XcodeのSDKによって処理されていたはずです。 これらがサポートされないということはXLPではアプリをビルドしないと考えるべきでしょう。

Continuous

ContinuousはiOS上で動作するC#、F#用のIDE(統合開発環境)です。 iPadやiPhoneで書いたコードがその場で実行できるわけです。

ところで、iOSアプリでは実行時コンパイルができません。そのためContinuousは読み込んだコード解析して、それを再現する処理を実行しているはずです。

つまり、こんなコードを書かれた場合

// ユーザーが各コード
UIlabel label = new UILabel();
label.Text = "hello world";

このようなコードに相当する処理を実行しているということです。

// Continuousが実行する処理
object variable = Activator.CreateInstance(Type.GetType("UILabel"));
Type.GetType("UILabel").GetProperty("Text").SetValue(variable, "hello word", null);

ユーザーがどのクラスを使用するか不明なため、主要なライブラリはアプリに同梱しておく必要があります。その証左としてContinuousのアプリサイズは201MBあります、かなり大きいですね。

さて、話をXamarin Live Playerに戻します。

制限事項より、Android/XcodeのSDKを使ってビルドされたアプリケーションパッケージが実行されていないことが読み取れました。ということは、Visual Studioで書かれたソースコードはContinuousのようにインタープリタ形式で実行されていると考えられます。

ならば、XLPのiOS版アプリは通常よりもはるかに多きいサイズであるはず。 (補足:通常のXamarin.iOSアプリでは参照されないクラスを削ってサイズを小さくしている)

実際 197MB ありました。うん、これはもう間違いなくContinuousと同じ仕組みですね。 (ちなみにAndroidはアプリと別にライブラリをインストールできるし、実行時にコンパイルできるのでもっと小さいです、30MBくらいだそうな)

まとめ

  • XLPはVisual Studio(for Mac)から転送されたソースコードをインタープリタ形式で実行している。
  • Android/Xcode SDKを使ってビルドしないので通常のXamarinアプリとはできることがかなり違う。
    • 動作する仕組みも違うので実機デバッグの代わりにはならない。
  • 系譜としてはむしろXamarin Workbookのような一種のplaygroundに近い気がする。
    • 身もふたもない言い方をすると強化されたGorilla Player。
  • デバッグ可能な点は新しい。
  • 通常のアプリ開発に必要な開発端末のセットアップ無しでXamarinのコードを(制限付きで)実行できるのはちょっとうれしい。
  • XLPでiOSアプリを作ることはできない。もちろん公開もできない。
  • Macを買わずにWindowsだけでiOSアプリをリリースできるなどという妄想は捨てる。

ちなみに、この記事を書いている時点でもまだXLP試せてません。何しろコレなもので。

【Xamarin.Forms 2.3.4-pre】ちゃんとBindableになったPicker

Xamarin.Forms 2.3.4-preでPickerがItemsSourceとItemSelectedをサポートするようになります。すっごーい!

さっそくこんな感じのViewModelを用意してContentPageのBindingContextにセットします。

public class ViewModel : INotifyPropertyChanged
{
    public event PropertyChangedEventHandler PropertyChanged;

    public IEnumerable<AnimalFriend> Friends { get; }

    AnimalFriend _bestFirend;
    public AnimalFriend BestFriend
    {
        get { return _bestFirend; }
        set
        {
            _bestFirend = value;
            PropertyChanged?.Invoke(this, new PropertyChangedEventArgs(nameof(BestFriend)));
        }
    }

    public ViewModel()
    {
        Friends = new[]{
            new AnimalFriend { Name = "サーバル" },
            new AnimalFriend { Name = "ジャガー" },
            new AnimalFriend { Name = "トキ"},
            new AnimalFriend { Name = "ツチノコ"},
        };
    }
}

public class AnimalFriend
{
    public string Name { get; set; }
}

ContentPageのXAMLはこんな感じ。

<?xml version="1.0" encoding="UTF-8"?>
<ContentPage xmlns="http://xamarin.com/schemas/2014/forms"
             xmlns:x="http://schemas.microsoft.com/winfx/2009/xaml"
             x:Class="XFApp44.BindablePickerPage">
    <ContentPage.Content>
        <StackLayout Padding="15, 40, 15, 20">
            <Picker HeightRequest="40"
                    Title="いちばんのともだちをおしえてね"
                    ItemsSource="{Binding Friends}"
                    ItemDisplayBinding="{Binding Name, StringFormat='{0}ちゃん'}"
                    SelectedItem="{Binding BestFriend, Mode=OneWayToSource}"/>
            <Label Text="{Binding BestFriend.Name, StringFormat='{0}ちゃんととっても仲良しなんだね、すっごーい!'}" />
        </StackLayout>
    </ContentPage.Content>
</ContentPage>

ItemsSourceの各アイテムをPickerに表示する際にはPicker.ItemDisplayBindingを使って適切なプロパティPathを指定することが可能です。 Binding構文で指定するのでStringFormatも使えます。かしこーい。

f:id:ticktack623:20170207011818j:plain

【Xamarin.Forms 2.3.4-pre】新しいOnPlatformメカニズム

Xamarin.Forms 2.3.4-preで新しいOnPlatformの仕組みが導入され、従来の物は非推奨となります。

概要

  • 動作プラットフォームを文字列で判別するアプローチに変更(従来はenum)
  • Xamarin.Formsがサポートしていないプラットフォームへの対応が容易に(Tizenとか)
  • XAMLのOnPlatformで複数のプラットフォームに対してまとめて値を設定可能に
  • Device.OnPlatform(), Device.OnPlatform<T>() は実質廃止

RuntimePlatform

これまで、実行中のプラットフォームを取得するにはenum TargetPlatform型のDevice.OSプロパティを使用して来ました。

これを置き換える形でstring型のDevice.RuntimePlatformプロパティが新しく定義されます。

(Xamarin.Forms本体に定義されていない独自のプラットフォームを追加しやすくする意図があるみたい、Tizenとか?)

Xamarin.FormsがサポートするプラットフォームはDeviceクラスの定数として定義されます。

public const string iOS = "iOS";
public const string Android = "Android";
public const string WinPhone = "WinPhone";
public const string Windows = "Windows";
public const string macOS = "macOS";

つまり動作プラットフォームの判別は以下のように変わります。

// 従来のコード(obsolete)
Deviec.OS == TargetPlatform.Android

// これから推奨されるコード
Device.RuntimePlatform == Device.Android

Device.OnPlatformの廃止

Device.OnPlatform()、Device.OnPlatform<T>()がobsoleteとなり、代わりにswitch文とRuntimePlatformを組み合わせて使う事が推奨されます。

// 従来のコード(obsolete)
Device.OnPlatform(
    () => { /* iOS */ },
    () => { /* Android */ },
    () => { /* WinPhone */ },
    () => { /* Default */ });

label.Text = Device.OnPlatform<string>("iOS", "Android", "WinPhone");

// これから推奨されるコード
switch(Device.RuntimePlatform)
{
    case Device.iOS:
        /* iOS */ break;
    case Device.Android:
        /* Android */ break;
    case Device.WinPhone:
        /* WinPhone */ break;
    case Device.Windows:
        /* Windows */ break;
    case Device.macOS:
        /* macOS */ break;
    case "SomethingNewPlatform":
        /* 独自プラットフォームの場合の処理 */ break;
    default:
        /* default */
}

Xamarin.Formsがサポートしていないプラットフォームへも対応しやすくなっていますね。

OnPlatform<T>クラスの仕様変更

XAMLでプラットフォームごとの値を設定するのに使われていたOnPlatform<T>クラスの使い方が変わります。

これまでのOnPlatform<T>のプロパティとして各プラットフォームごとの値を設定していた代わりに、子要素として持たせる形になります。

<!-- 従来のコード(obsolete) -->
<OnPlatform x:TypeArguments="x:Double">
    <OnPlatform.iOS>20.0</OnPlatform.iOS>
    <OnPlatform.Android>42.0</OnPlatform.Android>
</OnPlatform>

<!-- これから推奨されるコード -->
<OnPlatform x:TypeArguments="x:Double">
    <On Platform="iOS">20.0</On>
    <!-- 複数プラットフォームを指定可能 -->
    <On Platform="Android, Windows">42.0</On>
</OnPlatform>

子要素となるOnクラスのOn.Platformにはカンマ区切りで同時に複数のプラットフォームを指定できます。ここに指定する名前はRuntimePlatformのに使われる文字列と対応します。

Xamarin.Forms.TabbedPageのiOS版でタブを上側に変更するサンプル

teratailで回答したやつ。

Xamarin - Xamarin.FormsのTabbedページのUIをiOSとAndroidで揃えたい(62739)|teratail

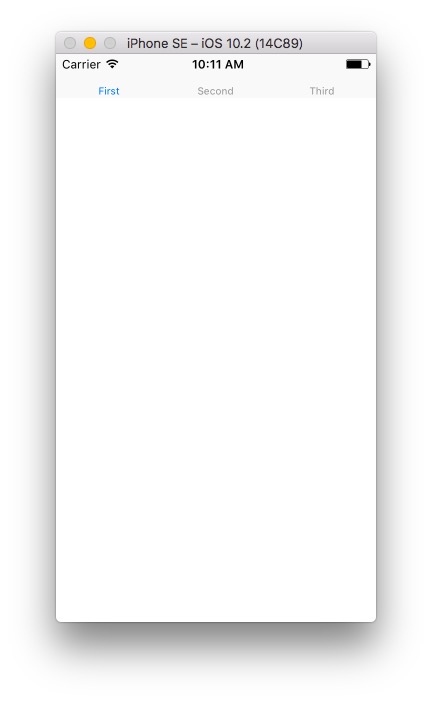
スクショ

f:id:ticktack623:20170121111728j:plain

f:id:ticktack623:20170121111738j:plain

stackoverflowの回答を参考にしています。

ios - Positioning UITabBar at the top - Stack Overflow

Xamarin.iOS側のプロジェクトに Xamarin.Forms.Platform.iOS.TabbedRenderer の派生クラスを作ります。

TabbedRendererはUITabBarControllerから派生しているので、ViewWillLayoutSubviews() をoverrideして処理を追加します。

using System;
using UIKit;
using Xamarin.Forms;

[assembly: ExportRenderer(typeof(TabbedPage), typeof(TopTabbarSample.iOS.TopTabbedRenderer))]

namespace TopTabbarSample.iOS
{
    /// <summary>
    /// iOSのTabbedPageのタブバーを上側に表示するためのRenderer
    /// </summary>
    public class TopTabbedRenderer : Xamarin.Forms.Platform.iOS.TabbedRenderer
    {
        // stackoverflowの回答を元にタブバーの位置を上に変更 http://stackoverflow.com/questions/29579992/positioning-uitabbar-at-the-top
        public override void ViewWillLayoutSubviews()
        {
            base.ViewWillLayoutSubviews();

            TabBar.InvalidateIntrinsicContentSize();

            var orientation = UIApplication.SharedApplication.StatusBarOrientation;

            nfloat tabSize = 44.0f;

            if(orientation == UIInterfaceOrientation.LandscapeLeft ||
               orientation == UIInterfaceOrientation.LandscapeRight)
            {
                tabSize = 32.0f;
            }

            var tabFrame = TabBar.Frame;
            tabFrame.Height = tabSize;
            tabFrame.Y = View.Frame.Y;
            TabBar.Frame = tabFrame;

            // 強制的にぼかしを再描画する小技らしい
            TabBar.Translucent = false;
            TabBar.Translucent = true;
        }
    }
}

動作確認用ページ

<?xml version="1.0" encoding="utf-8"?>
<TabbedPage xmlns="http://xamarin.com/schemas/2014/forms"
            xmlns:x="http://schemas.microsoft.com/winfx/2009/xaml"
            xmlns:local="clr-namespace:TopTabbarSample"
            x:Class="TopTabbarSample.TopTabbarSamplePage">
    <TabbedPage.ItemsSource>
        <x:Array Type="{x:Type x:String}">
            <x:String>First</x:String>
            <x:String>Second</x:String>
            <x:String>Third</x:String>
        </x:Array>
    </TabbedPage.ItemsSource>
</TabbedPage>

GitHubにも置いておきます。

Xamarin.Androidでアプリのビルド時にJavaのヒープがあふれる時の対処

Xamarin.Androidでアプリのビルド時に...

java.lang.OutOfMemoryError. Consider increasing the value of $(JavaMaximumHeapSize). Java ran out of memory while executing 'java.exe -jar ~'

のようにJavaのヒープ領域があふれてエラーになったら

対処

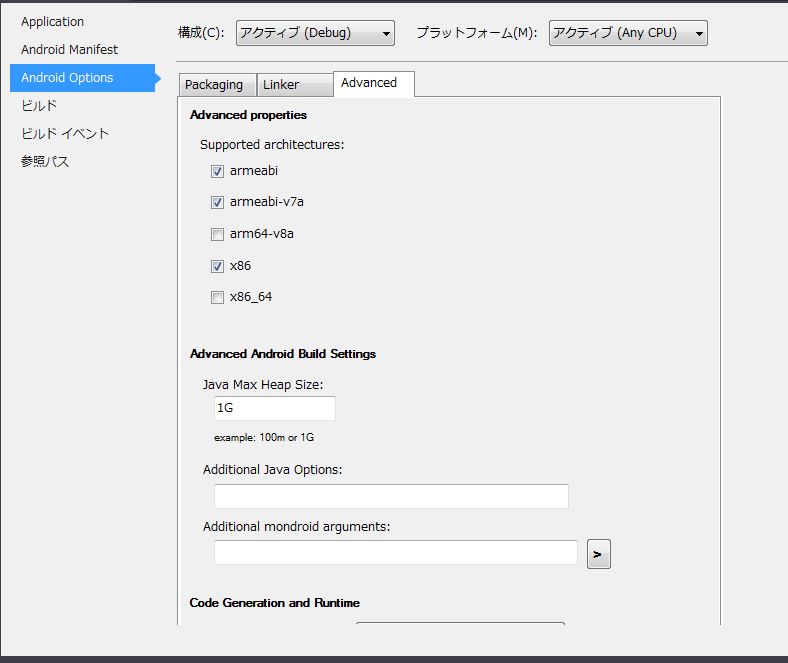
Xamarin.Androidプロジェクトの設定からヒープ領域のサイズを変更できます。

Android Options > Advanced > Advanced Android Build Settings > Java Max Heap Size

f:id:ticktack623:20170113142622j:plain

取り合えず「1G」にして足りなかったら上げればOK(そこまで必要な場合あるのかな?)

【Xamarin.Forms 2.3.3】 Platform Specifics

Xamarin.Forms 2.3.3で Platform Specifics という機能が追加されました。

これはPCLなどの共通コードからプラットフォーム固有の機能を呼び出したりする類のものです。(ただしコードビハインド限定)

Forumでの紹介文によると...

Introducing Platform Specifics! Features or behaviors that apply to one platform only can now be implemented without requiring custom renderers. These new features/behaviors can then be accessed easily via a fluent code API or XAML.

Vendors can easily add their own Platform Specifics by attaching Effects to them (see 63a924d and 1f9482e for complete example).

This feature implements the framework that enables the new API and also includes several examples of platform specific features, which can be previewed using the Platform Specifics gallery page:

  • Blur support for any VisualElement on iOS
  • Translucent navigation bar on iOS
  • Partially collapsed navigation bar (with icons!) on MasterDetailPage on Windows
  • Toolbar placement options on Windows
  • AdjustResize/AdjustPan on Android (known issue: AdjustResize disables status bar color)

とのこと。

Custom RendererやEffectsを使ってやるようなことが簡単にできる風に書かれていますね。

サンプル

さっぱり分からないと思うのでサンプルコードを用意しました。

using System;
using Xamarin.Forms;
using Xamarin.Forms.PlatformConfiguration;
using Xamarin.Forms.PlatformConfiguration.iOSSpecific;

namespace PratformSpecificsSample
{
    public class MyNaviPage : Xamarin.Forms.NavigationPage
    {
        public MyNaviPage()
        {
            BackgroundColor = Color.Pink;

            var button = new Button
            {
                Text = "Toggle Translucent",
                BackgroundColor = Color.Silver,
            };

            button.Clicked += (sender, args) => On<iOS>()
                .SetIsNavigationBarTranslucent(!On<iOS>().IsNavigationBarTranslucent());

            var content = new ContentPage
            {
                Title = "iOS Translucent Navigation Bar",
                Content = new StackLayout
                {
                    VerticalOptions = LayoutOptions.Center,
                    HorizontalOptions = LayoutOptions.Center,
                    Children = { button },
                }
            };

            PushAsync(content);
        }
    }
}

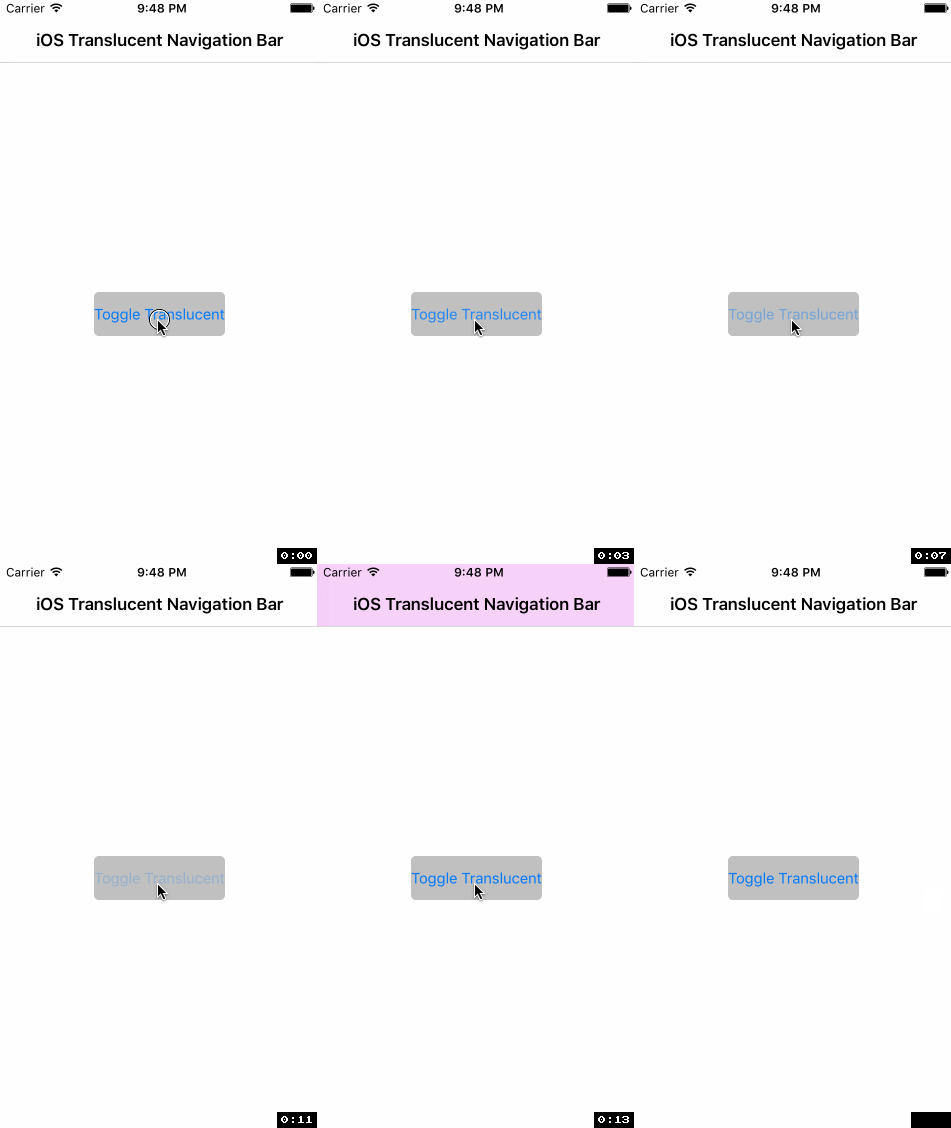
このコードを実行するとこんな感じになります。

f:id:ticktack623:20170113004240g:plain

ボタンをタップする度に、ナビゲーションバーの透過を切り替えるというiOS固有の効果が発動しています。

Platform Specifics が使われているのはこの部分、

button.Clicked += (sender, args) => On<iOS>()
    .SetIsNavigationBarTranslucent(!On<iOS>().IsNavigationBarTranslucent());

やっていることは On<iOS>().SetIsNavigationBarTranslucent() が透過ON/OFFのセット、 On<iOS>().IsNavigationBarTranslucent() が現在の透過状態の取得ですね。

Element.On<T>() を入り口として、「対象Elementとプラットフォームの組み合わせという文脈に固有な機能をPCLから呼び出せる」というのが Platform Specifics の意義といえるでしょう。

BoxViewの例

例えば、BoxViewに続けて .On<iOS>(). と入力するとインテリセンスから GetBlurEffect()UseBlurEffect() が呼び出せて...

f:id:ticktack623:20170113004413j:plain

.On<Android>(). には呼び出せるものが無い、といった塩梅です。

f:id:ticktack623:20170113004436j:plain

使い方まとめ

1. usingを追加

using Xamarin.Forms.PlatformConfiguration;
using Xamarin.Forms.PlatformConfiguration.iOSSpecific;
using Xamarin.Forms.PlatformConfiguration.AndroidSpecific;
using Xamarin.Forms.PlatformConfiguration.WindowsSpecific;

2. だいたいクラス名衝突が発生するので修正する

これはPlatform Specificsの実装が悪い。

なぜNavigationPageに対する拡張メソッドを定義するクラスを「NavigationPage」にしてしまうのか……

3. Element(ApplicationとかPageとかViewのこと)の .On<TIConfigPlatform>() を呼ぶ

Xamarin.Forms 2.3.3時点でTIConfigPlatformに入れられるのは以下の3種類。(GitHubのコード上ではTizenも追加されているので2.3.4には入ってくるかも)

public sealed class Android : IConfigPlatform { }
public sealed class iOS : IConfigPlatform { }
public sealed class Windows : IConfigPlatform { }

4. インテリセンスで使いたい機能を選ぶ

TElement.On<TIConfigPlatform>() の戻り値は IPlatformElementConfiguration<TIConfigPlatform, TElement> のインスタンスとなっており、プラットフォーム固有機能は拡張メソッドで実装されています。つまり後付けなので自分で実装するのもアリ。

ライブラリ開発者向け情報

Xamarin.Formsのカスタムコントロールなどを配布する場合、IElementConfiguration<TElement>を実装してPlatform Specificsのエントリポイント用意してあげるといいかもしれない。

(プラットフォーム固有機能は拡張メソッドで生やせるけども、エントリポイントはコントロールで実装しなければならないため)